


AdWords has a few dirty little secrets they don’t want you to know about.
The first is that their “Quality Score” is weighted to provide more clicks for ads with the highest click through rate (CTR). Why? Because they make money every time someone clicks your ad.
The second is that the advice AdWords and its reps give isn’t always in your best interest. In fact, more often than not, it mostly helps Google to make more money by getting you to bid on more keywords or by increasing your budget (although you can get some really good advice from AdWords reps from time to time).
And last but not least are default settings. Most people don’t realize it, but there are at least 15 default AdWords settings that will drain your bank account and cause you to spend more than you need to spend to get more customers.
Would you like to know which settings those are? Good, let’s talk about that now.
#1: Campaign Type
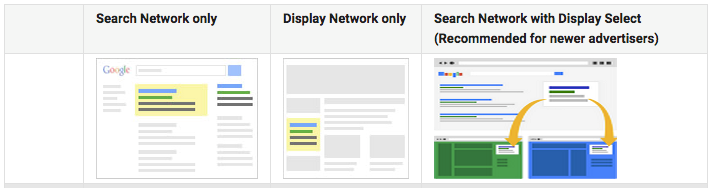
The default (and Google recommended) setting for new AdWords campaigns is “Search Network with Display Select,” but any PPC manager who knows what they’re doing will tell you that you should bid on Search and Display Networks separately. In fact, this is a test you can give any new PPC manager. Ask if they bid on Search and Display together or separately. If they say together, then they’re not quite the AdWords expert they say they are.
To top it off, Google even recommends bidding on the Search Network with Display Select as the “best opportunity to reach the most customers.
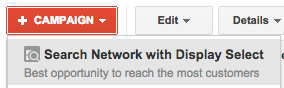
Search Network with Display Select may be the easiest way to reach the most people, but it’s definitely not the best way to reach people in the most cost effective way.
The reason for this is the difference in the ways that the Search and Display Networks are set up. The Search Network shows your ads to people who searched for a keyword you’re specifically targeting. The Display Network, on the other hand, shows a text version of your ad (just like the one shown in search results) within content on pages they deem are related to the keyword you’re targeting.
Here’s what your ad looks like in the Search Network:
And here’s what your ad looks like in the Display Network:
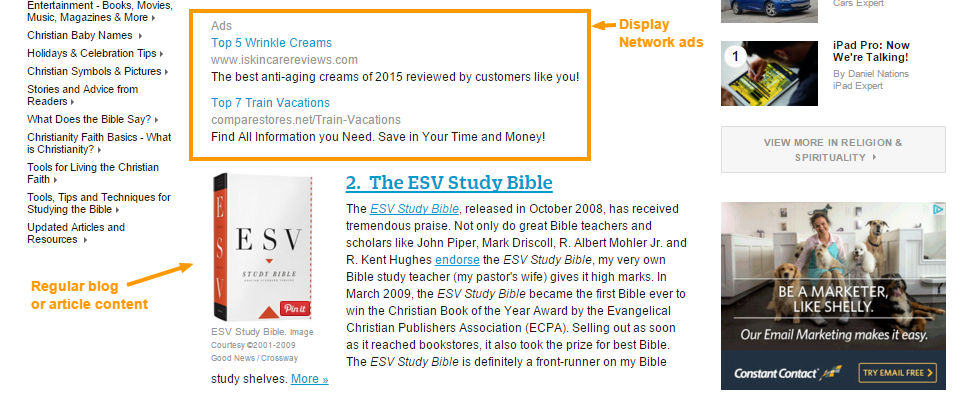
As you can imagine, Search with Display Network provides more impressions, visibility, and clicks for your ad, but each network requires a different strategy, different targeting, different messaging, different budgets, etc.
So we’re not saying that you shouldn’t ever use the Display Network, we’re just saying that Search and Display should be managed separately so you have better tracking and targeting and get better results.
Many times when auditing accounts that were set up this way, I find that over 80% of the budget has gone towards the Display Network even though the advertiser intended to advertise on the Search Network. You should also know that the Search Network tends to have higher conversion rates which means if you’re advertising for the Search and Display Networks together, then you may be spending up to 80% of your budget on the ads that are the least likely to convert.
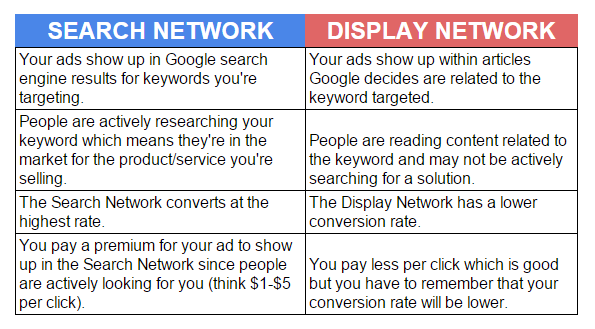
Here’s a quick recap of Search and Display Networks to give you a better idea about how they work.
TAKEAWAY: Avoid this option and choose “Search Network Only” as a starting point. Search with Display Select is designed to make Google the most money, or as a commenter on Reddit recently said, “Search Network with Display Select is cancer.”
#2: Campaign Sub-Type
After you choose “Search Network only” there are a couple of default settings that will greatly restrict your ability to maximize your ROI which means your budget will drain away rather quickly.
AdWords sub-types default to “Standard” which means you don’t get access to several important settings (shown below).
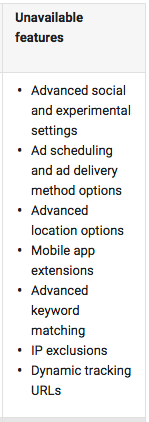
Some of these are for more advanced users, which means you might never use them, and that’s fine. But why restrict your campaign before you even get started?
Takeaway: Always choose “All Features.”
Some of the most important features you miss out on by selecting “Standard” include:
#3: Advanced Location Settings
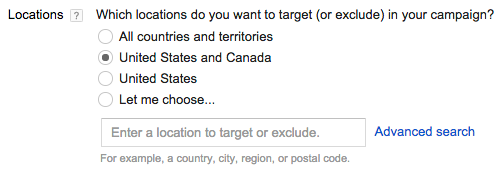
Without selecting “All Features,” you miss out on advanced location options.
Here’s why this matters.
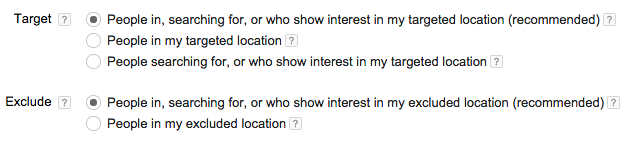
If you only want to reach people near your business, you have to be able to select the second option in the Target option list above.
A local coffee shop, for example, may want to advertise their special espresso roast. Since their customers have to walk into their store and can’t order online, they don’t want to target people looking for a coffee shop across town or a place to visit while on vacation next week. They just want to target people currently in an area near their location.
A hotel, however, needs to be able to select option #3, i.e. “People searching for, or who show interest in my targeted location.” This is due to the fact that they’re less interested in locals searching about their city and are more interested in reaching people searching from other cities who will be visiting their city in the near future. Thus, they want to target people searching for their city more than people searching from within their targeted location.
You should also know that the campaign location defaults to your country, or if you’re in the U.S., it defaults to the United States and Canada. More times than not, however, you don’t want to target such a large area or population, especially under one campaign. Local campaigns will want to target local cities only, and many national advertisers will want to create multiple campaigns to target different states or cities individually.
One More Location Tip: Separate your campaigns by country, state, or city to better control budget and bids by location.
Takeaway: Choose the locations that make the most sense for your business, and if needed, select “people searching in my targeted location” or “people searching for, or who show interest in my targeted location.”
#4: Ad Scheduling
If you don’t select the “Advanced” settings, then you won’t be able to schedule your ads during business hours.
Let’s go back to our coffee shop example for a minute. It would be a waste of budget to advertise when your shop is closed. But if you chose the default “Standard” setting, you wouldn’t be able to set the time of day when your ads run, or more importantly, when they don’t run.
There are many cases where you’d want to turn your ads off completely—such as the weekends—which to be completely honest, shouldn’t be an advanced feature.
There are also ad schedule bid adjustments you can make that are similar to location bid adjustments, but they aren’t available with the “standard” features. You should, however, take advantage of ad scheduling adjustments to move your bids up or down for your best and worst days.
For example I personally manage a handful of campaigns where Mondays are the best performing days by a large amount so I have been slowly increasing the bid adjustment to get more conversions on Mondays which lowers the overall cost per acquisition.
Takeaway: Local businesses need to have the ability to advertise when they’re open and to turn off ads when their business is offline.
#5: Ad Extensions
With the standard settings you miss out on some important ad extensions.

Ad extensions are a factor that affects Quality Score (QS), a number from 1 to 10 that determines how well your keywords, ad, and landing page align. A higher QS means you pay less per click and usually allows your ad to show higher on the search engine results page (SERP). Your QS is also affected by your ad click-through rate (CTR), and an extra line of text provided by an ad extension or two will have a big impact on your CTR which in turn affects your QS.
The good news is that Google recently changed (added) the ability to use ad extensions even if you’re using the Standard campaign settings, but you don’t have the ability to add them during the campaign creation walk-through phase, which means many advertisers don’t even know that these ad extensions exist and may miss out on them entirely.
Here are some of the extensions you may miss out on if you don’t know they exist:
#6: Callout Extensions
Callouts are probably the easiest extension to implement and allow you to add an extra line of text…for free!
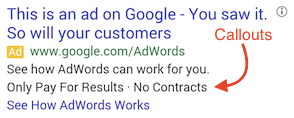
A good way to start using Callouts is to add company or campaign-wide features and benefits like:
- Free shipping!
- 24/7 customer support!
Etc.
This allows your ad to take up more space while also adding specific benefits and features for your product.
#7: Review Extensions
Reviews allow you to establish credibility and add another line of text… also for free!
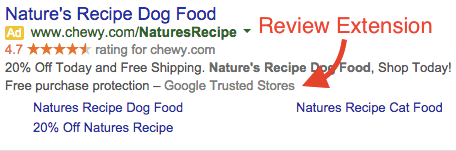
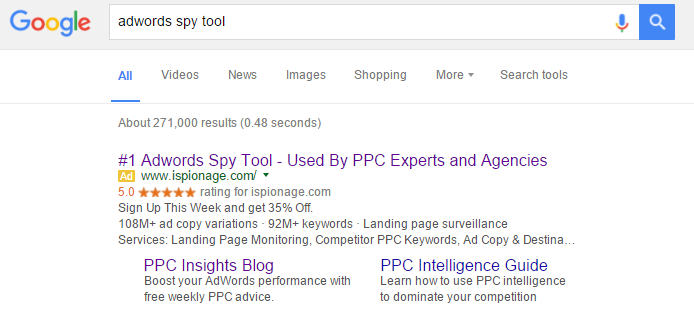
As you can see, reviews lower the resistance for potential buyers and increase credibility for your business. They’re also easy to implement as long as you have a review, article, or award within the last year.
PPCHero is one of the most popular blogs in the industry so citing them like iSpionage does below is a great way to establish credibility for iSpionage’s brand.
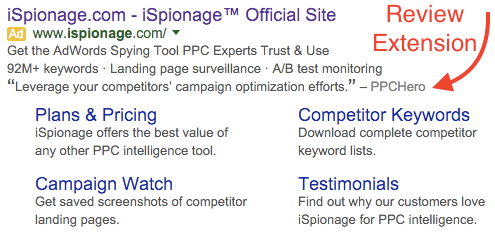
Recommendation: Do make a note that Adding reviews isn’t easy and requires you to follow Google’s strict requirements, but they’re very useful and effective if you’re able to meet the requirements and get them set up.
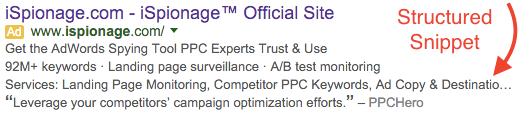
#8: Structured Snippet Extensions
Structured snippets are the newest ad extension publicly available to all advertisers.
They allow you to highlight a variety of things in a list format. The header options you can use for your list are seen below.

There are many creative ways you can use a structured snippet list to help show a prospect what you have to offer, whether it be which neighborhoods you service, brands you sell, different styles of the product, and much, much more.
In the example below, iSpionage uses structured snippets to list additional features of their software using the “Service Catalog” heading.
Takeaway: Use as many of the ad extensions available as you can, and when possible, add them at the very beginning when setting up your initial campaign.
#9: Ad Rotation
Without selecting the “Advanced” setting, you won’t be able to rotate your ads the way you need to in order to accurately select a winning ad variation.
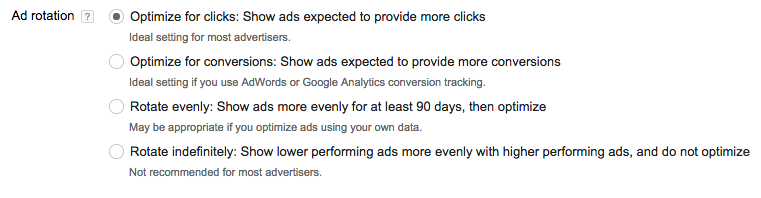
Google frequently decides on a winning ad much too quickly which means you need to select the “rotate indefinitely option” if you want more control over your ad testing options, like I do. On the other hand, if you aren’t an advanced user and don’t know how to run a scientific ad copy test, then you may want to select “Rotate evenly,” although if you’re tracking conversions properly, you can also choose “Optimize for conversions.”
As someone who manages accounts every day, I select “Rotate indefinitely” so I have more control over when an ad copy test is ended based on my own data, but this may not be the best option for most people since it requires careful monitoring, labeling ads by date so you know when they were created, and understanding statistical significance.
Since that’s the case, I recommend that most people choose one of the middle two settings so you don’t give Google too much control but also don’t get overwhelmed by having to know how to run a scientific ad copy A/B test.
Takeaway: Select “Rotate evenly” or “Optimize for conversions” unless you’re an advanced user or want to learn how to manage ad copy tests like an advanced user. Selecting “Rotate evenly” means that if you forget about creating new ads, the system will have more time to get enough data to make a decision on its own. “Optimize for conversions,” on the other hand, requires much more data to select a winning combination which means AdWords will be forced to take more time to select a winning ad.
#10: Search Network + Search Partners
Note: This option is available whether or not you chose “All features” for the campaign sub-type.
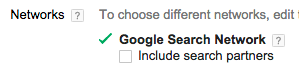
The Google Search Network includes Google.com (or your country specific version), Google Shopping, and Google search partners.
According to Google, search partners are “non-Google search sites (like AOL) that partner with Google to show search ads.”
So here’s the million dollar question: Do you want to show your ads on just the Google Search Network or should you include Google’s search partners?
What you need to know to answer this question is that the problem with search partners is that you can’t specifically see which sites your ads are being displayed on, and you can’t opt in or out of those sites individually.
You’re either all-in or all-out.
Amazon.com, for example, is a search partner and their ads can be all the way at the bottom of the page, but when looking at your stats in AdWords, it will say the ads are at the very top which is quite confusing.
Side Note: Bing gives you much more control over specific sites on their partner network.
I recommend unchecking “Include search partners” as a starting point. However, if you get to the point where you are profitably reaching your entire market, then go ahead and include the partner network to see how it goes.
Just know that the CTR, CPC, and audience—among many other factors—can vary widely on the partner network as compared to actual Google search results.
Also know that you will have to segment by network in the AdWords interface to see stats for the partner network separately.
Takeaway: Uncheck “Include search partners” as a starting point for your campaign and switch back to search partners if you’re profitably reaching your audience and need a way to expand.
#11: Ad Creation
So you finally got through the campaign creation. Give yourself a high five!
Now you have to create an Ad Group complete with keywords and an ad.
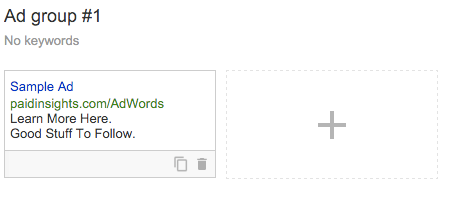
Google does the right thing here by automatically having you create a “Text ad” option, and they recently changed the ad creation walk-through to allow you create more than one ad by default. A huge improvement if you ask me.
Keep in mind you should always create at least two ads for every ad group so you can test which one does better with four ads being ideal—two for desktop and two for mobile.
Takeaway: By default Google only requires one ad for your ad group, but you should create between two and four ads in order to begin learning what copy works the best and begin optimizing your ad copy from the very beginning.
#12: Broad Match Keywords
Adding keywords is where Google really leads you astray.
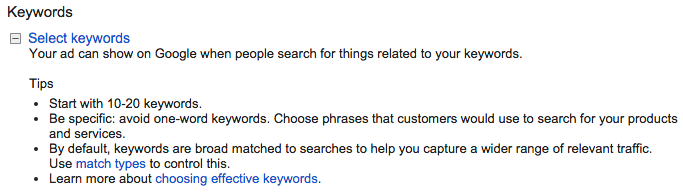
“By default, keywords are broad matched …” is the important bullet to pay attention to.
It’s hidden three lines down, and they claim you will still reach “relevant traffic”. That’s not true, and it’s not even close.
What’s worse, they don’t even explain match types at all and just include a link for more information. (I highly recommend learning more about match types if you don’t already know the difference between broad, phrase, exact, and broad match modifier keywords.)
The first bullet in the list also says “start with 10-20 keywords.” In many cases you will want to cut that number in half to 5-10 keywords per ad group for better relevance to your ads and higher quality scores.
The one point I give Google credit for is bullet two. It’s good advice, but they removed it from their new ad group creation wizard as seen below.
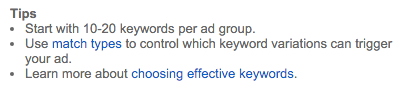
Notice how the new version doesn’t mention broad match at all? And they still don’t give you any way to change the match types in a UX-friendly way.
Takeaway: First, spend some time to learn about different AdWords match types. Next, use +modified +broad +match, “phrase,” or [exact] match to start. Never, ever use pure broad match, unless you want to spend your budget faster with hardly any results to show for it.
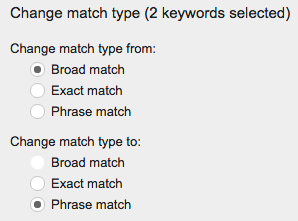
#13: Modified Broad Match
Because you can’t automatically create or change to this match type in the interface, many advertisers don’t even know it exists.
Yet modified broad match is the most powerful match type you can use.
So how does it work? Basically, it’s very similar to phrase match, but the word order doesn’t matter.
With phrase match keywords, you enter a phrase like “adwords competitor keyword tool,” and your ads will show up for any search that includes the phrase in that order such as:
- Best adwords competitor keyword tool
- Cheap adwords competitor keyword tool
- Affordable adwords competitor keyword tool
Etc.
But when you use modified broad match by adding a plus sign to the beginning of keywords, then your ad shows up for any search that includes all of the words that have a plus sign in front of them, but the order doesn’t matter.
For example, if you bid on the term +adwords +competitor +keyword +tool, then you would show up for any search that includes all of those keywords, such as:
- Competitor keyword tool for adwords
- Best competitor tool for adwords keywords
Etc.
This makes modified broad match valuable because it shows up for any term a similar phrase match keyword would show up for but also shows up phases that include the keywords you want to show up for but in an order you aren’t able to predict.
In fact, modified broad match is so powerful that many experienced advertisers almost exclusively use modified broad in combination with exact match.
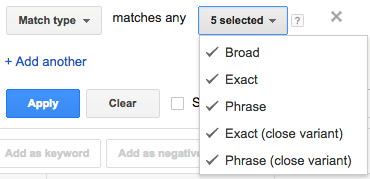
Yet it’s not mentioned anywhere in the default AdWords settings, take a look:
#14: Negative Keywords

We’re now finsihed with the initial campaign, ad group, and keyword creation, yet there’s been no mention of one of the most important “settings” in AdWords—negative keywords. (Although, in a slightly positive twist, Google recently moved the negative keyword section to a tab near the top of the interface. Previously it was located at the bottom, below a list of keywords that could be 50 or so keywords long.)
So how do negative keywords work?
Negative keywords allow you to restrict your ads from showing up for similar but unrelated searches.
For example, if your keyword is “window repair” but you only service residential homes, you will need to include negatives for car, truck, auto and even rear, side, passenger, etc. as those will be exclusively vehicle-related terms which your business is unable to repair.
Do you see how not adding negatives will open up your account to waste a huge amount of your budget from unqualified searches?
In fact, doing proper keyword research is just as important for choosing negatives as it is for choosing the keywords you’re going to target.
Negative keyword lists (which are still hidden but are now more findable) help you to exclude common low-intent terms from all your campaigns and allows you to manage them in one place.
Pro Tip: Keep in mind that negative keywords will not match to synonyms, plurals and misspellings which means you have to add them yourself.
Takeaway: Be sure to add negative keywords to your campaign in order to avoid spending money on clicks that Google thinks are related but actually aren’t related to your business, product, or service.
#15: Automatic Bidding

This technically isn’t a default setting, but it’s very tempting to use it.
You mean you don’t have to guess what to set your bids at and Google will optimize to get the most clicks? Why not, right?
If your goal is just to spend your entire budget every day, this might be a good option. But remember that Google’s goals and your goals as an advertiser don’t line up. By signing up for this feature, you’re letting Google, the company that makes money when you spend it, decide how much of your budget to use up and at what rate. On the surface, it seems like a good idea, but when you think about it a bit longer, you realize that it’s not.
Takeaway: Just avoid this setting altogether.
BONUS: Mobile Bid Adjustment Exclusion
Is your website mobile-friendly? How about your landing pages?
For many small business this still isn’t the case, and you could be wasting a large portion of your budget on mobile traffic that will have a negative experience and will likely bounce.
The good news is that you can still get to the Devices tab in the campaign settings with standard campaigns, but the default setting means you bid the same amount for mobile and desktop visits which may not be a good idea if your site isn’t mobile optimized.
Takeaway: If your website isn’t optimized for mobile (or more importantly, mobile converting) or the data shows poor results for mobile traffic, then you will want to decrease your mobile bid. Choosing -100% will exclude mobile all together, which may make sense if you don’t convert mobile traffic at all.
It’s Time to Double Check Your Account
Hopefully, you learned a lot from reading this in-depth guide to default AdWords settings.
I also recommend scheduling some time to double check your AdWords account to see if you’re leaking money by making some of these mistakes. If so, follow the steps in this guide to plug the holes so you’ll be on your way to more profitable PPC campaigns.
p.s. If you benefited from this post (and made it this far) please consider sharing and/or subscribing to the iSpionage blog so we can continue publishing awesome articles like this one for our readers.
About the Author
 Ross Kaplan-Winn (@paidinsights) consults on digital marketing strategy and the best ways to profitably grow a business online from his home base in Denver, Colorado. He also teaches small businesses and entrepreneurs how to make AdWords work for their business at paidinsights.com.